With numerous approaches and even more development tools available the developer has the freedom to pick and choose. Here are your options.


Having an App available for any service adds a tremendous value for the same and it isn’t the domain of programmers anymore. However, without any programming knowledge whatsoever, you aren’t going to be able to build apps as easy. In the early days we had to work on individual SDKs if an app was to be developed, but as the years went by more and more tools were released that could be used to develop apps on multiple platforms at the same time. In the following pages we are going to highlight three different approaches towards building apps and the amount of know-how needed to follow that particular approach will be highlighted as well. There are umpteen number of tools available with each have some advantage over the others, we’ve picked some of the most popular ones for you.
Before we start pulling out the hair on our heads (If you get into programming it’s bound to happen) we need to know the different approaches we can undertake towards building apps and the advantages/ drawbacks of each approach. There are three approaches to going about building apps, the first is to go native which gives you the most flexibility since all the API features of a particular platform are made available to you. The major drawback is that you can only program the app on one platform. There are multiple reasons for the same but the most obvious one is that the language used on each platform is different – Android uses Java, iOS uses Objective C and Windows Phone uses the .NET framework. Further on, certain functionalities like access to the phone’s camera, push notifications and other hardware are only available if you develop on the native platform or at least use a wrapper. Security is one aspect which can be best implemented on natively built apps compared to the other approaches.
The second approach is to build a webapp which is basically a HTML5 website that is accessed via webview. This approach is more favourable if you already can develop HTML5 websites and all you need to do is create a CSS for your website that is broad enough to cater to as many resolutions as possible. One major advantage to HTML5 apps is that the interface will seem the same from whichever device you open the app. Also, if there are any errors in the content then you can fix it without having all your users download the app all over again from the app store.
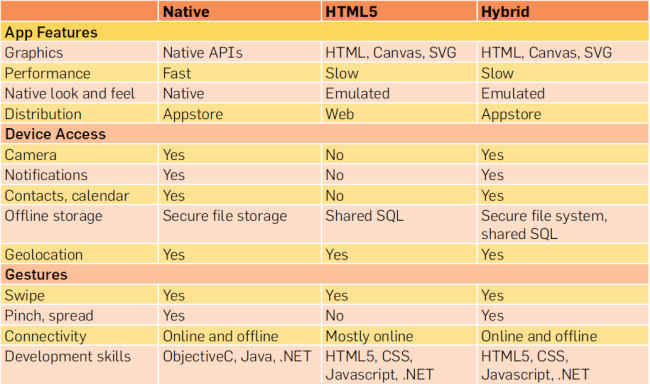
While initially these webapps didn’t have access to most of the native features of your phone, there are workarounds for some of these native features now like iScroll which enables pinch-to-zoom and other gestures. JQuery Mobile is another framework which enables more features on HTML5 pages which look and feel like a native app. The third approach is a hybrid between the above two approaches. There now exist frameworks which have a native codebase which interacts with the phone while the front end is made out of HTML5. These apps give you access to native features of each platform while exercising the flexibility of HTML5. The HTML5 webpages can be saved onto your phone (local storage) or hosted on a remote server (remote storage) with a few local pages just in case the internet connectivity is lost while the app is in use. The table below compares these three approaches:
Before you start!
You should prep for programming by getting hold of all the software needed for each approach. We’ll be listing these at the beginning of each section. But before you can compile these projects you will need your developer certificate or signing key from each store. Certain tools will allow you to compile without a certificate but not for all platforms, Apple’s system is a little too stringent and most tools won’t create the package for iOS till you upload or provide the developer certificate. Android apps can be packaged and sideloaded onto your device to test without the certificate on most tools. Now there is no need for getting a Mac if you wish to obtain an Apple developer certificate as is stated in the documentation. Check this link out for a way to do the same without a Mac. For iOS, Android and Windows phone you need to register for a developer account and pay a certain registration fee to obtain your developer certificates. Also, each individual app store has a certain review process and do restrict certain parameters. All of these things need to be adhered to if you wish to have your app approved. These guidelines can be obtained at Apple's developer site and Google's Android developer site.
Test, test and test!
While a simulator can run your apps effortlessly it is always advisable to have a device to test out your apps. If you include more native features then a proper feedback is only obtained if using a physical device. But if you simply wish to test your HTML5 website then you can use the emulator in Chrome to view your pages as you work on them. Since Chrome uses Blink as the engine you will get a more similar look as obtained in Android devices. Blink is a fork of Webkit which powers iOS’ UIWeb- View so the webpage will be rendered the same as on iOS.
Hybrid Approach
For this method you’ll have to pick a framework to go with. There are a few frameworks but the popular ones are listed below.
• Corona
• PhoneGap
• Appcelerator
We’ll build a simple HTML5 app using PhoneGap as a wrapper to provide access to native features of each platform.
Step 1 - Pick the resolution
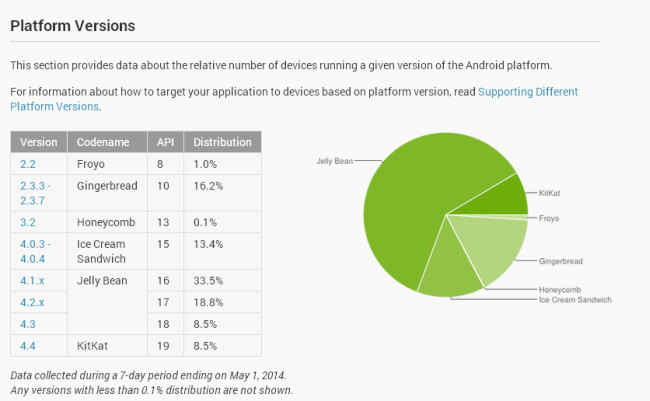
A primary thing you need to keep in mind while building using HTML5 is that the very same layout will need to be rendered in the exact same way across all screen resolutions that exist. Refer the image below to figure out the most popular resolutions. Keep in mind that the CSS for your website has to incorporate all these resolutions otherwise your app will look different on different devices. There are way too many resolutions listed here so pick the ones that are most popular. This link shows the different resolutions of active android devices along with statistics highlighting how popular they are.
Step 2 - Code your website
You can use any tool to create your website, be it dreamweaver or kompozer or any of the numerous alternatives. However, if there are many includes in the web page then the app load time will increase. We tried our hand at creating a design using Adobe Muse and then compiled it using PhoneGap. The application load time was around 8 seconds on a Nexus 4. If you wish to make use of any of the native features then use the appropriate function call. The example for geolocation is given below.
Finding geolocation...
This code returns the following as the output. There are numerous examples like these for making use of each native functionality using PhoneGap’s API. Most of them can be found here.
There are a few things you need to keep in mind while coding your website, starting off with the amount of external libraries. Use as few external libraries as possible to make the application smooth. Using libraries are convenient but there are a lot more functions present in each library than you need, so unless you intend to use one or two libraries efficiently your application will be cumbersome to use. You might have to sacrifice on looks since they will be rendered differently on different platforms. This is absolutely fine. Use CSS as much as possible to load media since they get rendered only when the media needs to be displayed. This way you save on memory usage. Instead try to make use of the memory you will save to pre-load pages that are more likely to be clicked on.
The example code for jQuery Mobile is given below.
The entire page gets loaded and you don’t have to experience the 250-300 millisecond delay that is inherently present in Webkit. PhoneGap apps appear slow because of this delay and “lazy-loading” is one of the ways of getting around this issue. Avoid long lists as much as possible and avoid gradients in CSS since these are calculated my the GPU of the device and will take up quite the processing power but that doesn’t mean that you can’t use gradients anywhere, optimise its usage.
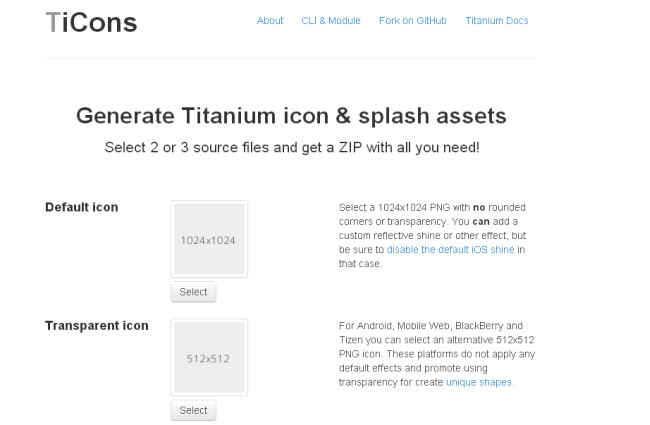
Step 3 - Generate assets
While coding you will come up with various elements and in order to get the work done as quickly as possible most programmers insert a simple blank image of the proper dimensions. Once you’ve finished coding you need to start creating all those images. Do keep in mind the image densities while doing so, otherwise you are likely to create an app that is compatible with very few devices. Or if you create just a few assets then your app will look wonderful on a few devices while it renders absolutely worse on everything else. This is why you need to generate multiple images/icons/ splash screens for screens of different densities. This way you app seems the same no matter which device you are viewing it on. You can find all the different icon sizes that PhoneGap need from this link and for the splash screens from this link. Or you could simply generate all of them by uploading a few images using the following tool.
Step 4 - Arrange the file structure
Once you have all the files ready, you need to arrange them in a certain order depending upon what all you are going to use. Take your existing project folder with the HTML files and all the included libraries and put them all together in a folder labelled “www”. If you’ve made use of any plugins that we mentioned earlier or any at all then those plugins need to be kept in a folder labelled “plugins” which sits at the same level as “www”. There are two more folders but you only need to use them if you have coded your application in such a manner that breaks down your code as platform specific and platform independant. In this case all platform specific files are stored in the “platforms” folder with each platform having their own folder at the same level (ios, android, bada, etc.).
Step 5 - Create the manifest
In the root directory of your app you’ll need to provide a config.xml file with all the parameters about your app. This includes the name of the app, the different permissions that you’ll need on each platform, core plugins, third-party plugins, icons and splash screens for each platform. If you’ve included third-party plugins which require an authentication key of any sort then you’ll get a example code which you’ll have to include in the xml code. Don’t worry though, if you don’t make the xml file on your own then the build service will do it for you but all the plugins won’t work and all the icons will be replaced with the standard PhoneGap icons.
Step 6 - Zip it up!
Finally, you just have have to compress your folder using zip compression and no encryption. The config.xml file ensures that all the necessary permissions are included with your application when it is compiled. This is the package you’ll need to upload to the PhoneGap build web site or you can commit the files via github.
Step 7 – Upload
Visit Adobe Phonegap Build and sign up for an account. If you use Github for your signin then you can upload your project folder to Github and have new builds generated as soon as you modify any file. This process is not automated since this Build service is provided free of cost. If you were wondering about the signing keys for each platform them you need to add them to your Phonegap account. Otherwise your application package will not be generated for that particular platform. Even if it is generated you still won’t be able to upload these files to the appropriate app store. In the image below you can see that only two packages are generated, the rest aren’t either because a signing key was not provided or the PhoneGap version selected for the build is incompatible with the said platform.
Step 8 - Test your app
If you have a developer account then you can test your app out on your iOS device, for android devices you need not worry about having an developer account. Simply enable application installation from “Unknown Sources” in your Android device’s security settings and you can install your app by transferring the apk file to your device and then tapping on the file using any file browser.
Step 9 - Upload to the store
Once you have tested all the apps and are satisfied with it you may proceed towards uploading it to each store. If you are submitting an app for the first time then the review process will take about 24-48 hours after which you can find your app on the respective app store.
Source: Digit